Archive April 2, 2021

Visual Studio Code vs Android Studio

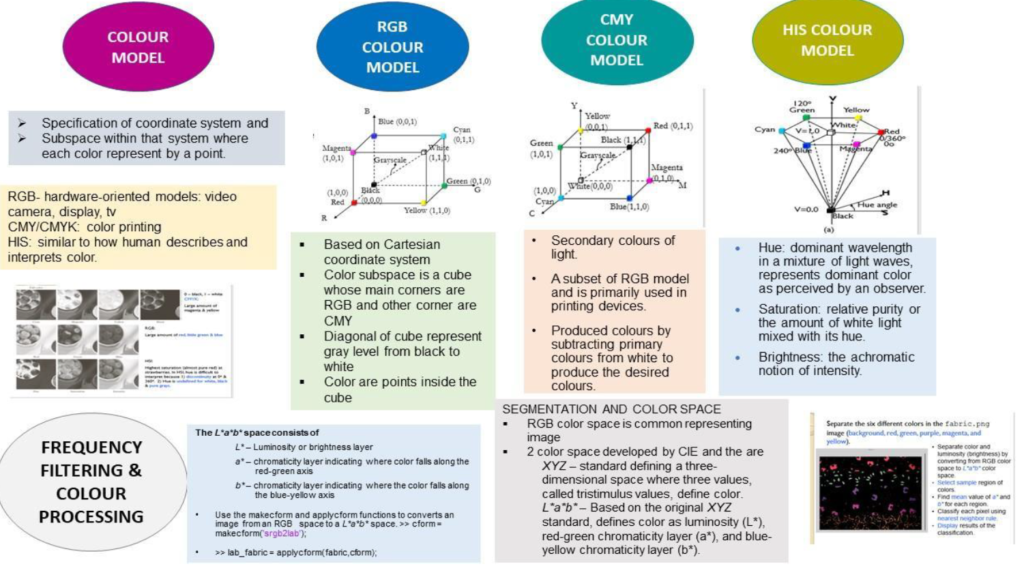
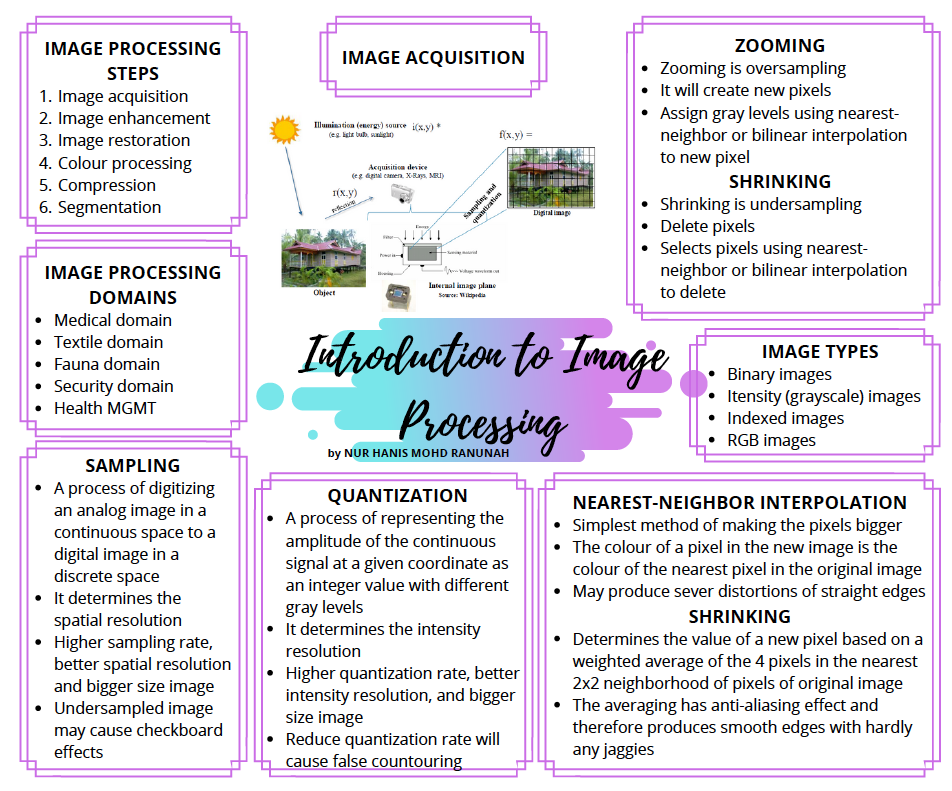
So what should I use?

There are a variety of functionality differences between these two tools. Visual Studio Code is lighter than Android Studio, so if you are genuinely limited by your hardware, you may be better off on Visual Studio Code. Also, some plugins and enhancements are only available for one or the other, so that will impact your decision as well. I personally prefer Android Studio, but you should use both and make your own decision.

In the early days I went between both tools before finally settling on Android Studio. There’s no reason why you can’t do the same😊.

And of course, you should use what works best for you. For every article recommending Android Studio, I’m sure there’s an article recommending Visual Studio Code. As always, if you have any questions be sure to let us know in the Codemagic Slack channel.

Thanks for reading!

Android studio-


Pros

Android Studio is the software built by Google themselves to be used for Android Development. As such, it’s certain that support for it will never drop as long as Android apps are still being developed.
Studio is also the tool that Google recommends using for Android development and it’s the IDE that gets updates related to Android first.


Cons
Gradle sync fail Render problem Class can’t be found Layout Reinstall repository Update SDK (even with latest version)
Android Studio is the official IDE for Android and it works great as an Android IDE. Unfortunately, that’s the only thing it can do. If you want to develop applications for other platforms in Java, you have to learn another IDE as well.


Visual Studio-


Pros

Visual Studio Code comes fairly complete out of the box, but there are many plug-ins available to extend its functionality.
There is very solid TypeScript integration in Visual Studio Code. Both are developed by Microsoft and VSC itself is written in TypeScript.
Visual Studio Code has integrated Git control, guaranteeing speed, data integrity, and support for distributed, non-linear workflows.
These features allow you to have a glance at code without opening it as a whole in a separate tab. Moreover, editing is allowed.


Cons
Sometimes it doesn’t tell you if you made a typo in a method name or if a method is not used and several other important features.
Because file search is so slow your results are limited in order to simulate a faster search.
It’s absolutely not possible to use this tool with big projects given how long it takes to search for files.
These are the points I looked on comparing AS and VS from my point of view if you have a fast pc then I would suggest you to go with Android STUDIO. Although vs is faster compared to AS but AS have a lote more functionalities which is cherry on cake.

Source: https://stackoverflow.com/questions/64500866/why-do-we-need-to-use-android-studio-for-building-a-flutter-app/64500964

Course syllabus & Schema of work (MRD 501)

This course is intended to enable students to understand the underlying principles of digital image formation and their applications in medical imaging areas. It is structured to acquaint the students with basic understanding and applications of image processing concept, common techniques and mathematical foundations.

At the end of the course, students should be able to:

  • Explain the basic theories, concepts and various image processing techniques related to digital image processing.
  • Solve problem related to image processing in medical imaging using various image processing techniques.
  • Demonstrate teamwork skills through group lab task on digital images, using MATLAB.

Course Syllabus

TopicRemarks
WEEK 1
(20/3 – 24/4)

Course introduction
 
Lecture:
Introduction to the course

 Lab 1: MATLAB installation
WEEK 2 
27/3 – 31/3)

Chapter 1.1 – Introduction to Image processing

 
β€’ What is digital image
β€’ What is image processing
β€’ Applications of image processing
β€’ Image processing Hardware

Start Entrance Survey (28 Mac-10 April)
Textbook: 
Chapter 1 & 2 

Lecture note 1:
Introduction to Image processing

Lab 2: (Watch)
Complete MATLAB guide
Introduction to MATLAB
 
WEEK 3
(3/4 – 7/4)


Chapter 1.2 – Introduction to Image processing

β€’ Human visual perception
β€’ Image properties
β€’ Image aqcuisition
β€’ Image type
β€’ Spacial & gray-level resolution
β€’ Zoom & shrinking
 
Textbook: 
Chapter 2 

Start assignment

Lecture note 1:
Introduction to Image processing


Lab 3: (Watch)
Lab lesson 1 (Introduction)
Download image
WEEK 4
(10/4 – 14/4)


Chapter 2.1 – Image Enhancement (Spatial domain)

β€’ Histogram processing
β€’ Graylevel transformations


Textbook: 
Chapter 3 

Lecture note 2:
Image Enhancement

 
Lab 4: (Watch)
Lab lesson 2 (image fundamental)
Download image

WEEK 5
(17/4 – 21/4)


Chapter 2.2 – Image Enhancement (Spatial domain)

β€’ Image smoothing
β€’ Image sharpening


Textbook: 
Chapter 3

Lecture note 2:
Image Enhancement
 
Lab 5: (Watch)
Lab lesson 3 (image enhancement using point processing operation)
Download images
(24/4 – 28/4)Break – Hari Raya Puasa
WEEK 6
(1/5 – 5/5)


Chapter 2.3 – Image Enhancement (Spatial domain)

β€’ Logical and arithmetic operations


Lecture note 2:
Image Enhancement

Lab 6: (Watch)
Lab lesson 4 (image enhancement using arithmetric operation)
Download images
WEEK 7
(8/5 – 12/5)


TEST 1

TEST 1 – (8/5/2023)

Lab 7:
Basic GUI (Text field & button)

WEEK 8
(15/5 – 19/5)


Chapter 3 – Frequency Filtering


Textbook: 
Chapter 3 

Lecture note 3:
Frequency Filtering
 
Lab 8(Watch)
Lab lesson 5 (Spatial linear filtering)
Download images
WEEK 9
(22/5 – 26/5)

Chapter 4.1 – Color Processing

β€’ Color models
β€’ Color segmentation


Submit assignment – (22/5/2023)

Textbook: 
Chapter 6 

Lecture note 4:
Color Processing
Lecture note 6:

Lab 9
Lab lesson 6 (Derivatives filtering)
Basic GUI (Slider)
Basic GUI (Pop-up menu)
(29/5 – 2/6)Semester break Hari Gawai
WEEK 10
(5/6 – 9/6)


Chapter 4.2 – Color Processing

 
β€’ Color smoothing and sharpening


Textbook: 
Chapter 6 

Lecture note 4:
Color Processing

Lab 10: (Watch)
Lab lesson 7 (Filtering in fourier domain)
Basic GUI (Plotting data to Axes)
Basic GUI (Insert image to Axes)
WEEK 11
(12/6 – 16/6)


Individual project preparation

Lab: Group project

 
Start individual project – (12/6/2023)
Start Student Feedback Online (SuFO) (13 June -24 July)

Past year paper discussion
Lab lesson 8 (Color processing)
Lab 11: (Watch lesson 7 and 8)
Project preparation and discussion
WEEK 12
(19/6 – 23/6)


Individual project preparation

Lab: Group project
Past year paper discussion

Lab 12: (Watch)
Project preparation and discussion
(26/6 – 30/6)Break – Hari Raya Aidil Adha
WEEK 13
(3/7 – 7/7)


Individual project preparation

Lab: Group project
Exit Survey (4 -17 July)

Past year paper discussion
Watch individual project presentation

Lab 13: 
Project preparation and discussion
WEEK 14
(10/7 – 14/7)

Individual project submission – (14/7/2023)

(17/7 – 21/7)Study week
Exit Student Feedback Online (SuFO)
Final examination – (1/8/2023)

Assessment (MRD 501)

Assessments

  • Assignment (20 % )
    • Assignment : 20 % (Submission deadline 22/5/2023)
  • Test (20%)
    • Test : 20 % (tentative date : 8/5/2023)
  • Individual Project (20%)
    • Project Files : 15 % (Final submission deadline: 14/7/2023)
    • Project video: 5% (Final submission deadline: 14/7/2023)
  • Final Examination (40%)
    • Test : 40 % (tentative date : 27/7/2023) – Dewan peperiksaan

Assignment (20%) – (22/5/2023)

Assignment need to be done by students are the lab assignment based on the 5 lab lessons. All 5 lab assignment need to be submitted at week 9. Please export to .pdf file and upload in the UFuture.

Test (20%) – (15/5/2023)

Test 1 (week 8) only cover chapter 1 and 2. This is close book test. Student will get a set of question and need to submit it within 1 hour.  Write the answer in the question paper. Structure of the test as below:

Objective : 10 questions (10 marks)

Fill in the blank: 10 questions (10 marks)

Short answer: 3 questions (30 marks)

Individual project (20%) – (14/7/2023)

Student need to submit a mini project using Matlab that has GUI (Graphical User Interface) that can modify an image and get some output from that. 

  1. The student need to develop a GUI (Graphical User Interface) project during the semester and submit at the end of semester. 
  2. The project must contains all of the following features:
    1. Read image file
    2. Convert to grayscale
    3. Convert to binary/BW
    4. Crop the image
    5. Function to enhance the image such as noise filtering, edit contrast and etc (at least 3).
    6. Save the output image in a project file.
  3. Submit the project file (.m and .fig) with your 5-10 minutes video (make it short but can cover all) presentation explaining your project. Must include yourself explaining the project.

Final examination (40%) – (1/8/2023)

Date: 1/8/2023

Time: 9.00 AM – 12.00 PM

Duration: 3 Hours

Location: Examination hall

This examination will cover all of the chapters (1-4).

Subjective questions and contain 2 parts:

  1. Part A – Objectives – (15 questions – 30 marks)
  2. Part B – Short essay – (7 questions – 80 marks)

Hints:

  1. List, calculation, define, explain, draw, elaborate, suggest, state, discuss, difference.
  2. No coding.
  3. Question has more marks need more explanation.